Showing posts with label system. Show all posts

Sunday, January 16, 2011

Turbocharge PuTTY with 12 Powerful Add-Ons – Software for Geeks #3


Ref: http://www.thegeekstuff.com/2008/08/turbocharge-putty-with-12-powerful-add-ons-software-for-geeks-3/

Turbocharge PuTTY with 12 Powerful Add-Ons – Software for Geeks #3
by Ramesh Natarajan on August 28, 2008
PuTTY LogoThis article is part of on-going Software For Geeks series. PuTTY is hands-down the best, free, and lightweight SSH client for Windows. I have provided list of 12 powerful PuTTY add-ons with screenshots, that will solve few shortcomings of the original PuTTY.  Play around with these add-ons and choose the one that suites your need.

1. PuTTY Connection Manager

PuTTYCM gives a nice feature to arrange several PuTTY sessions in tabs . While starting PuTTYCM for the first time, you should specify the location of the original PuTTY. This requires .NET 2.0 to be installed on the windows system. Following screen-shot displays three putty sessions in tabs within the same window.
Note: If the PuTTY Connection Manager opens the original PuTTY in a separate window, instead of opening as a TAB, please go to Tools -> Options -> Select the check-box “Enable additional timing for PuTTY capture (ms)” -> set the value to 300 ms. This will open the PuTTY window inside the TAB as shown below.
 
Note: Refer to the PuTTY Connection Manager Tutorial for more details on the PuTTY CM features.
 
PuTTY Connection Manager - Multiple Tab
Fig – PuTTY Connection Manager with multiple Tabs

2. PuTTYcyg

Cygwin users will absolutely love PuTTYcyg. This lets you use PuTTY as a local cygwin terminal. If you use cygwin on your windows, I’m sure you’ll hate the default MS-DOS looking cygwin window. Using PuTTYcyg, you can run cygwin inside PuTTY. I love this add-on and use it for my cygwin on Windows.
On PuTTYcyg, click on cygterm radio button in the Connection type. Enter – (hyphen) in the “Command (use – for login shell“, to connect to the cygwin on the windows laptop using PuTTY as shown below.
PuTTYcyg Cygterm radio-button
Fig – PuTTYcyg with Cygterm option

3. PuTTYtray

Using PuTTYtray, you can minimize the PuTTY window to the system tray on windows. By default, original PuTTY stores the session information in the registry. This is painful, when you want to transfer PuTTY sessions from one laptop to another. In PuTTYtray, there is an additional radio button “Sessions from file” as shown below, that will let you store session information in a file.
PuTTYtray
Fig – PuTTYtray with “Session from file” option

4. PuttyTabs

PuttyTabs provides a floating bar, that will display the open PuTTY sessions in TABs. Clicking on one of the tabs will bring the respective PuTTY session to the foreground. While starting PuTTYTabs for the first time, you should specify location of the original PuTTY. It reads the windows registry to get all the available PuTTY sessions. This also requires .NET 2.0 to be installed on the windows system. Following screen-shot displays three putty sessions arranged in tab.
PuTTYTabs Screenshot
Fig – PuTTYTabs with multiple Tabs

5. Quest PuTTY

Quest Software modified the PuTTY to add Active Directory (GSSAPI Kerberos) single sign-on feature. Quest PuTTY uses Microsoft’s Security Service Provider Interface (SSPI), which is Microsoft’s version of the GSSAPI, with which it is wire compatible. This version of PuTTY adds a new menu-item called GSSAPI, under Connection -> SSH, as shown below.
Quest PuTTY with GSSAPI
Fig – Quest PuTTY with GSSAPI option

6. Modified PuTTY

This modified PuTTY stores the PuTTY sessions in folder instead of storing it in the registry. If you already have sessions stored in the registry, it will display those also. The sessions stored in registry will be marked as [registry] as shown below. When you create a session using this PuTTY, this creates a sub-folder called session in the same folder where putty.exe is located, to store all the sessions in the file.
Modified Putty
Fig – Modified Putty displaying both registry and file sessions

7. PocketPuTTY

PocketPuTTY runs on Windows Mobile 2003/5.0 operating system. After I got my blackberry, I have dumped my Dell Axim that was running on Windows Mobile. So, I have not tried PocketPuTTY myself. If you’ve used PocketPuTTY or other mobile version of PuTTY, please leave your feedback.
PocketPuTTY UI
Fig – PocketPuTTY for Windows Mobile
 
Note: If you are using blackberry phone, refer to Blackberry PuTTY Tutorial for installing and configuring PuTTY on blackberry.

8. portaPuTTY

portaPuTTY is a modified version of the PuTTY that stores the session information in a file by default, instead of storing it in the windows registry. The session files are stored under .putty/sessions folder. The .putty folder is created under the same directory where the putty.exe is located.

9. PuTTY Portable

PuTTY Portable is part of PortableApps suite. Use this to launch PuTTY from the USB drive and carry the sessions along with you.

10. PuTTY Launchy Plugin

If you are using Launchy, the open source keystroke launcher for windows, you can use Putty Launchy Plugin, to launch putty sessions from Launchy very easily. i.e you can type “ssh” or “putty” followed by tab or space to list all of your PuTTY sessions. Once you select a particular session, Launchy will automatically launch that particular PuTTY session.
PuTTY Launchy Plugin
Fig – PuTTY Launchy Plugin. Type ssh followed by tab.

11. PuTTY Session Manager

PuTTY Session Manager will let you organize the PuTTY sessions into folders and assign hotkeys. This requires Microsoft .NET 2.0. Right click on the PSM icon in the system track and select “Session Hotkeys” to assign hot-keys for PuTTY session as shown below.
PuTTY Session Manager Hot Key Assignment
Fig – PuTTY Session Manager with session hot-key
To create a folder, right click on a particular PuTTY session -> Session Management -> New Folder. To move a existing session to a folder, just drag the session and drop to the corresponding folder.
PSM Session List with folders
Fig – PuTTY Session Manager with sessions inside sub-folder

12. PuTTY Command Sender

PuTTYCS is very helpful little tool that can boost your productivity by eliminating repetitive tasks performed on different servers. Using PuTTYCS, you can send a unix command to multiple PuTTY windows at the same time. You can use this to backup files, view log files, start and stop processes, copying file etc., on multiple servers, just by executing the command once, as shown below.
PuTTY Command Sender
Fig – PuTTYCS sends unix command to multiple PuTTY session

UNIX / Linux: 10 Netstat Command Examples


Reference : http://www.thegeekstuff.com/2010/03/netstat-command-examples/

UNIX / Linux: 10 Netstat Command Examples
by SathiyaMoorthy on March 29, 2010
Netstat command displays various network related information such as network connections, routing tables, interface statistics, masquerade connections, multicast memberships etc.,
In this article, let us review 10 practical unix netstat command examples.

1. List All Ports (both listening and non listening ports)

List all ports using netstat -a

# netstat -a | more
Active Internet connections (servers and established)
Proto Recv-Q Send-Q Local Address           Foreign Address         State
tcp        0      0 localhost:30037         *:*                     LISTEN
udp        0      0 *:bootpc                *:*                                

Active UNIX domain sockets (servers and established)
Proto RefCnt Flags       Type       State         I-Node   Path
unix  2      [ ACC ]     STREAM     LISTENING     6135     /tmp/.X11-unix/X0
unix  2      [ ACC ]     STREAM     LISTENING     5140     /var/run/acpid.socket

List all tcp ports using netstat -at

# netstat -at
Active Internet connections (servers and established)
Proto Recv-Q Send-Q Local Address           Foreign Address         State
tcp        0      0 localhost:30037         *:*                     LISTEN
tcp        0      0 localhost:ipp           *:*                     LISTEN
tcp        0      0 *:smtp                  *:*                     LISTEN
tcp6       0      0 localhost:ipp           [::]:*                  LISTEN

List all udp ports using netstat -au

# netstat -au
Active Internet connections (servers and established)
Proto Recv-Q Send-Q Local Address           Foreign Address         State
udp        0      0 *:bootpc                *:*
udp        0      0 *:49119                 *:*
udp        0      0 *:mdns                  *:*

2. List Sockets which are in Listening State

List only listening ports using netstat -l

# netstat -l
Active Internet connections (only servers)
Proto Recv-Q Send-Q Local Address           Foreign Address         State
tcp        0      0 localhost:ipp           *:*                     LISTEN
tcp6       0      0 localhost:ipp           [::]:*                  LISTEN
udp        0      0 *:49119                 *:*

List only listening TCP Ports using netstat -lt

# netstat -lt
Active Internet connections (only servers)
Proto Recv-Q Send-Q Local Address           Foreign Address         State
tcp        0      0 localhost:30037         *:*                     LISTEN
tcp        0      0 *:smtp                  *:*                     LISTEN
tcp6       0      0 localhost:ipp           [::]:*                  LISTEN

List only listening UDP Ports using netstat -lu

# netstat -lu
Active Internet connections (only servers)
Proto Recv-Q Send-Q Local Address           Foreign Address         State
udp        0      0 *:49119                 *:*
udp        0      0 *:mdns                  *:*

List only the listening UNIX Ports using netstat -lx

# netstat -lx
Active UNIX domain sockets (only servers)
Proto RefCnt Flags       Type       State         I-Node   Path
unix  2      [ ACC ]     STREAM     LISTENING     6294     private/maildrop
unix  2      [ ACC ]     STREAM     LISTENING     6203     public/cleanup
unix  2      [ ACC ]     STREAM     LISTENING     6302     private/ifmail
unix  2      [ ACC ]     STREAM     LISTENING     6306     private/bsmtp

3. Show the statistics for each protocol

Show statistics for all ports using netstat -s

# netstat -s
Ip:
    11150 total packets received
    1 with invalid addresses
    0 forwarded
    0 incoming packets discarded
    11149 incoming packets delivered
    11635 requests sent out
Icmp:
    0 ICMP messages received
    0 input ICMP message failed.
Tcp:
    582 active connections openings
    2 failed connection attempts
    25 connection resets received
Udp:
    1183 packets received
    4 packets to unknown port received.
.....

Show statistics for TCP (or) UDP ports using netstat -st (or) -su

# netstat -st

# netstat -su

4. Display PID and program names in netstat output using netstat -p

netstat -p option can be combined with any other netstat option. This will add the “PID/Program Name” to the netstat output. This is very useful while debugging to identify which program is running on a particular port.
# netstat -pt
Active Internet connections (w/o servers)
Proto Recv-Q Send-Q Local Address           Foreign Address         State       PID/Program name
tcp        1      0 ramesh-laptop.loc:47212 192.168.185.75:www        CLOSE_WAIT  2109/firefox
tcp        0      0 ramesh-laptop.loc:52750 lax:www ESTABLISHED 2109/firefox

5. Don’t resolve host, port and user name in netstat output

When you don’t want the name of the host, port or user to be displayed, use netstat -n option. This will display in numbers, instead of resolving the host name, port name, user name.
This also speeds up the output, as netstat is not performing any look-up.
# netstat -an
If you don’t want only any one of those three items ( ports, or hosts, or users ) to be resolved, use following commands.
# netsat -a --numeric-ports

# netsat -a --numeric-hosts

# netsat -a --numeric-users

6. Print netstat information continuously

netstat will print information continuously every few seconds.

Unix Sed Tutorial: Advanced Sed Substitution Examples


Reference : http://www.thegeekstuff.com/2009/10/unix-sed-tutorial-advanced-sed-substitution-examples/

Unix Sed Tutorial: Advanced Sed Substitution Examples
by Sasikala on October 26, 2009
Linux Sed Examples - Advanced Find and Replace OperationThis article is part of the on-going Unix Sed Tips and Tricks series.
In our previous sed articles we learned — sed printing, sed deletion, sed substitute , sed file write, and sed multiple commands.
In this article, let us review some interesting workarounds with the “s” substitute command in sed with several practical examples.

I. Sed Substitution Delimiter

As we discussed in our previous post, we can use the different delimiters such as @ % | ; : in sed substitute command.
Let us first create path.txt file that will be used in all the examples mentioned below.
$ cat path.txt
/usr/kbos/bin:/usr/local/bin:/usr/jbin:/usr/bin:/usr/sas/bin
/usr/local/sbin:/sbin:/bin/:/usr/sbin:/usr/bin:/opt/omni/bin:
/opt/omni/lbin:/opt/omni/sbin:/root/bin

Example 1 – sed @ delimiter: Substitute /opt/omni/lbin to /opt/tools/bin

When you substitute a path name which has ‘/’, you can use @ as a delimiter instead of ‘/’. In the sed example below, in the last line of the input file, /opt/omni/lbin was changed to /opt/tools/bin.
$ sed 's@/opt/omni/lbin@/opt/tools/bin@g' path.txt
/usr/kbos/bin:/usr/local/bin:/usr/jbin/:/usr/bin:/usr/sas/bin
/usr/local/sbin:/sbin:/bin/:/usr/sbin:/usr/bin:/opt/omni/bin:
/opt/tools/bin:/opt/omni/sbin:/root/bin

Example 2 – sed / delimiter: Substitute /opt/omni/lbin to /opt/tools/bin

When you should use ‘/’ in path name related substitution, you have to escape ‘/’ in the substitution data as shown below. In this sed example, the delimiter ‘/’ was escaped in the REGEXP and REPLACEMENT part.
$ sed 's/\/opt\/omni\/lbin/\/opt\/tools\/bin/g' path.txt
/usr/kbos/bin:/usr/local/bin:/usr/jbin/:/usr/bin:/usr/sas/bin
/usr/local/sbin:/sbin:/bin/:/usr/sbin:/usr/bin:/opt/omni/bin:
/opt/tools/bin:/opt/omni/sbin:/root/bin

II. Sed ‘&’ Get Matched String

The precise part of an input line on which the Regular Expression matches is represented by &, which can then be used in the replacement part.

Example 1 – sed & Usage: Substitute /usr/bin/ to /usr/bin/local

$ sed 's@/usr/bin@&/local@g' path.txt
/usr/kbos/bin:/usr/local/bin:/usr/jbin/:/usr/bin/local:/usr/sas/bin
/usr/local/sbin:/sbin:/bin/:/usr/sbin:/usr/bin/local:/opt/omni/bin:
/opt/omni/lbin:/opt/omni/sbin:/root/bin
In the above example ‘&’ in the replacement part will replace with /usr/bin which is matched pattern and add it with /local. So in the output all the occurrance of /usr/bin will be replaced with /usr/bin/local

Example 2 – sed & Usage: Match the whole line

& replaces whatever matches with the given REGEXP.
$ sed 's@^.*$@<<<&>>>@g' path.txt
<<>>
<<>>
<<>>
In the above example regexp has “^.*$” which matches the whole line. Replacement part <<<&>>> writes the whole line with <<< and >>> in the beginning and end of the line respectively.

III. Grouping and Back-references in Sed

Grouping can be used in sed like normal regular expression. A group is opened with “\(” and closed with “\)”.Grouping can be used in combination with back-referencing.
Back-reference is the re-use of a part of a Regular Expression selected by grouping. Back-references in sed can be used in both a Regular Expression and in the replacement part of the substitute command.

Example 1: Get only the first path in each line

$ sed 's/\(\/[^:]*\).*/\1/g' path.txt
/usr/kbos/bin
/usr/local/sbin
/opt/omni/lbin
In the above example, \(\/[^:]*\) matches the path available before first : comes. \1 replaces the first matched group.

Example 2: Multigrouping

In the file path.txt change the order of field in the last line of the file.
$ sed '$s@\([^:]*\):\([^:]*\):\([^:]*\)@\3:\2:\1@g' path.txt
/usr/kbos/bin:/usr/local/bin:/usr/jbin:/usr/bin:/usr/sas/bin
/usr/local/sbin:/sbin:/bin:/usr/sbin:/usr/bin:/opt/omni/bin:
/root/bin:/opt/omni/sbin:/opt/omni/lbin
In the above command $ specifies substitution to happen only for the last line.Output shows that the order of the path values in the last line has been reversed.

Example 3: Get the list of usernames in /etc/passwd file

This sed example displays only the first field from the /etc/passwd file.
$sed 's/\([^:]*\).*/\1/' /etc/passwd
root
bin
daemon
adm
lp
sync
shutdown

Example 4: Parenthesize first character of each word

This sed example prints the first character of every word in paranthesis.
$ echo "Welcome To The Geek Stuff" | sed 's/\(\b[A-Z]\)/\(\1\)/g'
(W)elcome (T)o (T)he (G)eek (S)tuff

Example 5: Commify the simple number.

Let us create file called numbers which has list of numbers. The below sed command example is used to commify the numbers till thousands.
$ cat  numbers
1234
12121
3434
123

$sed 's/\(^\|[^0-9.]\)\([0-9]\+\)\([0-9]\{3\}\)/\1\2,\3/g' numbers
1,234
12,121
3,434
123

3 Steps to Perform SSH Login Without Password Using ssh-keygen & ssh-copy-id


Reference: http://www.thegeekstuff.com/2008/11/3-steps-to-perform-ssh-login-without-password-using-ssh-keygen-ssh-copy-id/

3 Steps to Perform SSH Login Without Password Using ssh-keygen & ssh-copy-id
by Ramesh Natarajan on November 20, 2008
[OpenSSH Logo]You can login to a remote Linux server without entering password in 3 simple steps using ssky-keygen and ssh-copy-id as explained in this article.

ssh-keygen creates the public and private keys. ssh-copy-id copies the local-host’s public key to the remote-host’s authorized_keys file. ssh-copy-id also assigns proper permission to the remote-host’s home, ~/.ssh, and ~/.ssh/authorized_keys.

This article also explains 3 minor annoyances of using ssh-copy-id and how to use ssh-copy-id along with ssh-agent.

Step 1: Create public and private keys using ssh-key-gen on local-host

jsmith@local-host$ [Note: You are on local-host here]

jsmith@local-host$ ssh-keygenGenerating public/private rsa key pair.
Enter file in which to save the key (/home/jsmith/.ssh/id_rsa):[Enter key]
Enter passphrase (empty for no passphrase): [Press enter key]
Enter same passphrase again: [Pess enter key]
Your identification has been saved in /home/jsmith/.ssh/id_rsa.
Your public key has been saved in /home/jsmith/.ssh/id_rsa.pub.
The key fingerprint is:
33:b3:fe:af:95:95:18:11:31:d5:de:96:2f:f2:35:f9 jsmith@local-host

Step 2: Copy the public key to remote-host using ssh-copy-id

jsmith@local-host$ ssh-copy-id -i ~/.ssh/id_rsa.pub remote-host
jsmith@remote-host's password:
Now try logging into the machine, with "ssh 'remote-host'", and check in:

.ssh/authorized_keys

to make sure we haven't added extra keys that you weren't expecting.
Note: ssh-copy-id appends the keys to the remote-host’s .ssh/authorized_key.

Step 3: Login to remote-host without entering the password

jsmith@local-host$ ssh remote-host
Last login: Sun Nov 16 17:22:33 2008 from 192.168.1.2
[Note: SSH did not ask for password.]

jsmith@remote-host$ [Note: You are on remote-host here]

The above 3 simple steps should get the job done in most cases.

We also discussed earlier in detail about performing SSH and SCP from openSSH to openSSH without entering password.

If you are using SSH2, we discussed earlier about performing SSH and SCP without password from SSH2 to SSH2 , from OpenSSH to SSH2 and from SSH2 to OpenSSH.

Using ssh-copy-id along with the ssh-add/ssh-agent

When no value is passed for the option -i and If ~/.ssh/identity.pub is not available, ssh-copy-id will display the following error message.
jsmith@local-host$ ssh-copy-id -i remote-host
/usr/bin/ssh-copy-id: ERROR: No identities found

If you have loaded keys to the ssh-agent using the ssh-add, then ssh-copy-id will get the keys from the ssh-agent to copy to the remote-host. i.e, it copies the keys provided by ssh-add -L command to the remote-host, when you don’t pass option -i to the ssh-copy-id.
jsmith@local-host$ ssh-agent $SHELL
jsmith@local-host$ ssh-add -L
The agent has no identities.

jsmith@local-host$ ssh-add
Identity added: /home/jsmith/.ssh/id_rsa (/home/jsmith/.ssh/id_rsa)

jsmith@local-host$ ssh-add -L
ssh-rsa AAAAB3NzaC1yc2EAAAABIwAAAQEAsJIEILxftj8aSxMa3d8t6JvM79DyBV
aHrtPhTYpq7kIEMUNzApnyxsHpH1tQ/Ow== /home/jsmith/.ssh/id_rsa

jsmith@local-host$ ssh-copy-id -i remote-host
jsmith@remote-host's password:
Now try logging into the machine, with "ssh 'remote-host'", and check in:

.ssh/authorized_keys

to make sure we haven't added extra keys that you weren't expecting.
[Note: This has added the key displayed by ssh-add -L]

Three Minor Annoyances of ssh-copy-id

Following are few minor annoyances of the ssh-copy-id.

  1. Default public key: ssh-copy-id uses ~/.ssh/identity.pub as the default public key file (i.e when no value is passed to option -i). Instead, I wish it uses id_dsa.pub, or id_rsa.pub, or identity.pub as default keys. i.e If any one of them exist, it should copy that to the remote-host. If two or three of them exist, it should copy identity.pub as default.
  2. The agent has no identities: When the ssh-agent is running and the ssh-add -L returns “The agent has no identities” (i.e no keys are added to the ssh-agent), the ssh-copy-id will still copy the message “The agent has no identities” to the remote-host’s authorized_keys entry.
  3. Duplicate entry in authorized_keys: I wish ssh-copy-id validates duplicate entry on the remote-host’s authorized_keys. If you execute ssh-copy-id multiple times on the local-host, it will keep appending the same key on the remote-host’s authorized_keys file without checking for duplicates. Even with duplicate entries everything works as expected. But, I would like to have my authorized_keys file clutter free.

The Ultimate Bash Array Tutorial with 15 Examples


Reference : http://www.thegeekstuff.com/2010/06/bash-array-tutorial/

The Ultimate Bash Array Tutorial with 15 Examples
by Sasikala on June 3, 2010
An array is a variable containing multiple values may be of same type or of different type.  There is no maximum limit to the size of an array, nor any requirement that member variables be indexed or assigned contiguously. Array index starts with zero.
In this article, let us review 15 various array operations in bash.

This article is part of the on-going Bash Tutorial series. For those who are new to bash scripting, get a jump-start from the Bash Scripting Introduction tutorial.

1. Declaring an Array and Assigning values

In bash, array is created automatically when a variable is used in the format like,
name[index]=value
  • name is any name for an array
  • index could be any number or expression that must evaluate to a number greater than or equal to zero.You can declare an explicit array using declare -a arrayname.
$ cat arraymanip.sh
#! /bin/bash
Unix[0]='Debian'
Unix[1]='Red hat'
Unix[2]='Ubuntu'
Unix[3]='Suse'

echo ${Unix[1]}

$./arraymanip.sh
Red hat
To access an element from an array use curly brackets like ${name[index]}.

2. Initializing an array during declaration

Instead of initializing an each element of an array separately, you can declare and initialize an array by specifying the list of elements (separated by white space) with in a curly braces.
Syntax:
declare -a arrayname=(element1 element2 element3)
If the elements has the white space character, enclose it with in a quotes.
#! /bin/bash
$cat arraymanip.sh
declare -a Unix=('Debian' 'Red hat' 'Red hat' 'Suse' 'Fedora');
declare -a declares an array and all the elements in the parentheses are the elements of an array.

3. Print the Whole Bash Array

There are different ways to print the whole elements of the array. If the index number is @ or *, all members of an array are referenced. You can traverse through the array elements and print it, using looping statements in bash.
echo ${Unix[@]}

# Add the above echo statement into the arraymanip.sh
#./t.sh
Debian Red hat Ubuntu Suse
Referring to the content of a member variable of an array without providing an index number is the same as referring to the content of the first element, the one referenced with index number zero.

4. Length of the Bash Array

We can get the length of an array using the special parameter called $#.
${#arrayname[@]} gives you the length of the array.
$ cat arraymanip.sh
declare -a Unix=('Debian' 'Red hat' 'Suse' 'Fedora');
echo ${#Unix[@]} #Number of elements in the array
echo ${#Unix}  #Number of characters in the first element of the array.i.e Debian
$./arraymanip.sh
4
6

5. Length of the nth Element in an Array

${#arrayname[n]} should give the length of the nth element in an array.
$cat arraymanip.sh
#! /bin/bash

Unix[0]='Debian'
Unix[1]='Red hat'
Unix[2]='Ubuntu'
Unix[3]='Suse'

echo ${#Unix[3]} # length of the element located at index 3 i.e Suse

$./arraymanip.sh
4

6. Extraction by offset and length for an array

The following example shows the way to extract 2 elements starting from the position 3 from an array called Unix.
$cat arraymanip.sh
Unix=('Debian' 'Red hat' 'Ubuntu' 'Suse' 'Fedora' 'UTS' 'OpenLinux');
echo ${Unix[@]:3:2}

$./arraymanip.sh
Suse Fedora
The above example returns the elements in the 3rd index and fourth index. Index always starts with zero.

7. Extraction with offset and length, for a particular element of an array

To extract only first four elements from an array element . For example, Ubuntu which is located at the second index of an array, you can use offset and length for a particular element of an array.
$cat arraymanip.sh
#! /bin/bash

Unix=('Debian' 'Red hat' 'Ubuntu' 'Suse' 'Fedora' 'UTS' 'OpenLinux');
echo ${Unix[2]:0:4}

./arraymanip.sh
Ubun
The above example extracts the first four characters from the 2nd indexed element of an array.

8. Search and Replace in an array elements

The following example, searches for Ubuntu in an array elements, and replace the same with the word ‘SCO Unix’.
$cat arraymanip.sh
#!/bin/bash
Unix=('Debian' 'Red hat' 'Ubuntu' 'Suse' 'Fedora' 'UTS' 'OpenLinux');

echo ${Unix[@]/Ubuntu/SCO Unix}

$./arraymanip.sh
Debian Red hat SCO Unix Suse Fedora UTS OpenLinux
In this example, it replaces the element in the 2nd index ‘Ubuntu’ with ‘SCO Unix’. But this example will not permanently replace the array content.

9. Add an element to an existing Bash Array

The following example shows the way to add an element to the existing array.
$cat arraymanip.sh
Unix=('Debian' 'Red hat' 'Ubuntu' 'Suse' 'Fedora' 'UTS' 'OpenLinux');
Unix=("${Unix[@]}" "AIX" "HP-UX")
echo ${Unix[7]}

$./arraymanip.sh
AIX
In the array called Unix, the elements ‘AIX’ and ‘HP-UX’ are added in 7th and 8th index respectively.

10. Remove an Element from an Array

unset is used to remove an element from an array.unset will have the same effect as assigning null to an element.
$cat arraymanip.sh
#!/bin/bash
Unix=('Debian' 'Red hat' 'Ubuntu' 'Suse' 'Fedora' 'UTS' 'OpenLinux');

unset Unix[3]
echo ${Unix[3]}
The above script will just print null which is the value available in the 3rd index. The following example shows one of the way to remove an element completely from an array.
$ cat arraymanip.sh
Unix=('Debian' 'Red hat' 'Ubuntu' 'Suse' 'Fedora' 'UTS' 'OpenLinux');
pos=3
Unix=(${Unix[@]:0:$pos} ${Unix[@]:$(($pos + 1))})
echo ${Unix[@]}

$./arraymanip.sh
Debian Red hat Ubuntu Fedora UTS OpenLinux
In this example, ${Unix[@]:0:$pos} will give you 3 elements starting from 0th index i.e 0,1,2 and ${Unix[@]:4} will give the elements from 4th index to the last index. And merge both the above output. This is one of the workaround to remove an element from an array.

11. Remove Bash Array Elements using Patterns

In the search condition you can give the patterns, and stores the remaining element to an another array as shown below.
$ cat arraymanip.sh
#!/bin/bash
declare -a Unix=('Debian' 'Red hat' 'Ubuntu' 'Suse' 'Fedora');
declare -a patter=( ${Unix[@]/Red*/} )
echo ${patter[@]}

$ ./arraymanip.sh
Debian Ubuntu Suse Fedora
The above example removes the elements which has the patter Red*.

12. Copying an Array

Expand the array elements and store that into a new array as shown below.
#!/bin/bash
Unix=('Debian' 'Red hat' 'Ubuntu' 'Suse' 'Fedora' 'UTS' 'OpenLinux');
Linux=("${Unix[@]}")
echo ${Linux[@]}

$ ./arraymanip.sh
Debian Red hat Ubuntu Fedora UTS OpenLinux

13. Concatenation of two Bash Arrays

Expand the elements of the two arrays and assign it to the new array.
$cat arraymanip.sh
#!/bin/bash
Unix=('Debian' 'Red hat' 'Ubuntu' 'Suse' 'Fedora' 'UTS' 'OpenLinux');
Shell=('bash' 'csh' 'jsh' 'rsh' 'ksh' 'rc' 'tcsh');

UnixShell=("${Unix[@]}" "${Shell[@]}")
echo ${UnixShell[@]}
echo ${#UnixShell[@]}

$ ./arraymanip.sh
Debian Red hat Ubuntu Suse Fedora UTS OpenLinux bash csh jsh rsh ksh rc tcsh
14
It prints the array which has the elements of the both the array ‘Unix’ and ‘Shell’, and number of elements of the new array is 14.

14. Deleting an Entire Array

unset is used to delete an entire array.
$cat arraymanip.sh
#!/bin/bash
Unix=('Debian' 'Red hat' 'Ubuntu' 'Suse' 'Fedora' 'UTS' 'OpenLinux');
Shell=('bash' 'csh' 'jsh' 'rsh' 'ksh' 'rc' 'tcsh');

UnixShell=("${Unix[@]}" "${Shell[@]}")
unset UnixShell
echo ${#UnixShell[@]}

$ ./arraymanip.sh
0
After unset an array, its length would be zero as shown above.

15. Load Content of a File into an Array

You can load the content of the file line by line into an array.
#Example file
$ cat logfile
Welcome
to
thegeekstuff
Linux
Unix

$ cat loadcontent.sh
#!/bin/bash
filecontent=( `cat "logfile" `)

for t in "${filecontent[@]}"
do
echo $t
done
echo "Read file content!"

$ ./loadcontent.sh
Welcome
to
thegeekstuff
Linux
Unix
Read file content!
In the above example, each index of an array element has printed through for loop.

TCP DUMP Command Examples


Reference : http://www.thegeekstuff.com/2010/08/tcpdump-command-examples/

Packet Analyzer: 15 TCPDUMP Command Examples
by Sasikala on August 25, 2010
tcpdump command is also called as packet analyzer.
tcpdump command will work on most flavors of unix operating system. tcpdump allows us to save the packets that are captured, so that we can use it for future analysis. The saved file can be viewed by the same tcpdump command. We can also use open source software like wireshark to read the tcpdump pcap files.
In this tcpdump tutorial, let us discuss some practical examples on how to use the tcpdump command.

1. Capture packets from a particular ethernet interface using tcpdump -i

When you execute tcpdump command without any option, it will capture all the packets flowing through all the interfaces. -i option with tcpdump command, allows you to filter on a particular ethernet interface.
$ tcpdump -i eth1
14:59:26.608728 IP xx.domain.netbcp.net.52497 > valh4.lell.net.ssh: . ack 540 win 16554
14:59:26.610602 IP resolver.lell.net.domain > valh4.lell.net.24151:  4278 1/0/0 (73)
14:59:26.611262 IP valh4.lell.net.38527 > resolver.lell.net.domain:  26364+ PTR? 244.207.104.10.in-addr.arpa. (45)
In this example, tcpdump captured all the packets flows in the interface eth1 and displays in the standard output.
Note: Editcap utility is used to select or remove specific packets from dump file and translate them into a given format.

2. Capture only N number of packets using tcpdump -c

When you execute tcpdump command it gives packets until you cancel the tcpdump command. Using -c option you can specify the number of packets to capture.
$ tcpdump -c 2 -i eth0
listening on eth0, link-type EN10MB (Ethernet), capture size 96 bytes
14:38:38.184913 IP valh4.lell.net.ssh > yy.domain.innetbcp.net.11006: P 1457255642:1457255758(116) ack 1561463966 win 63652
14:38:38.690919 IP valh4.lell.net.ssh > yy.domain.innetbcp.net.11006: P 116:232(116) ack 1 win 63652
2 packets captured
13 packets received by filter
0 packets dropped by kernel
The above tcpdump command captured only 2 packets from interface eth0.
Note: Mergecap and TShark: Mergecap is a packet dump combining tool, which will combine multiple dumps into a single dump file. Tshark is a powerful tool to capture network packets, which can be used to analyze the network traffic. It comes with wireshark network analyzer distribution.

3. Display Captured Packets in ASCII using tcpdump -A

The following tcpdump syntax prints the packet in ASCII.
$ tcpdump -A -i eth0
tcpdump: verbose output suppressed, use -v or -vv for full protocol decode
listening on eth0, link-type EN10MB (Ethernet), capture size 96 bytes
14:34:50.913995 IP valh4.lell.net.ssh > yy.domain.innetbcp.net.11006: P 1457239478:1457239594(116) ack 1561461262 win 63652
E.....@.@..]..i...9...*.V...]...P....h....E...>{..U=...g.
......G..7\+KA....A...L.
14:34:51.423640 IP valh4.lell.net.ssh > yy.domain.innetbcp.net.11006: P 116:232(116) ack 1 win 63652
E.....@.@..\..i...9...*.V..*]...P....h....7......X..!....Im.S.g.u:*..O&....^#Ba...
E..(R.@.|.....9...i.*...]...V..*P..OWp........
Note: Ifconfig command is used to configure network interfaces

4. Display Captured Packets in HEX and ASCII using tcpdump -XX

Some users might want to analyse the packets in hex values. tcpdump provides a way to print packets in both ASCII and HEX format.
$tcpdump -XX -i eth0
18:52:54.859697 IP zz.domain.innetbcp.net.63897 > valh4.lell.net.ssh: . ack 232 win 16511
        0x0000:  0050 569c 35a3 0019 bb1c 0c00 0800 4500  .PV.5.........E.
        0x0010:  0028 042a 4000 7906 c89c 10b5 aaf6 0f9a  .(.*@.y.........
        0x0020:  69c4 f999 0016 57db 6e08 c712 ea2e 5010  i.....W.n.....P.
        0x0030:  407f c976 0000 0000 0000 0000            @..v........
18:52:54.877713 IP 10.0.0.0 > all-systems.mcast.net: igmp query v3 [max resp time 1s]
        0x0000:  0050 569c 35a3 0000 0000 0000 0800 4600  .PV.5.........F.
        0x0010:  0024 0000 0000 0102 3ad3 0a00 0000 e000  .$......:.......
        0x0020:  0001 9404 0000 1101 ebfe 0000 0000 0300  ................
        0x0030:  0000 0000 0000 0000 0000 0000            ............

5. Capture the packets and write into a file using tcpdump -w

tcpdump allows you to save the packets to a file, and later you can use the packet file for further analysis.
$ tcpdump -w 08232010.pcap -i eth0
tcpdump: listening on eth0, link-type EN10MB (Ethernet), capture size 96 bytes
32 packets captured
32 packets received by filter
0 packets dropped by kernel
-w option writes the packets into a given file. The file extension should be .pcap, which can be read by any network protocol
analyzer.

6. Reading the packets from a saved file using tcpdump -r

You can read the captured pcap file and view the packets for analysis, as shown below.
$tcpdump -tttt -r data.pcap
2010-08-22 21:35:26.571793 00:50:56:9c:69:38 (oui Unknown) > Broadcast, ethertype Unknown (0xcafe), length 74:
        0x0000:  0200 000a ffff 0000 ffff 0c00 3c00 0000  ............<...
        0x0010:  0000 0000 0100 0080 3e9e 2900 0000 0000  ........>.).....
        0x0020:  0000 0000 ffff ffff ad00 996b 0600 0050  ...........k...P
        0x0030:  569c 6938 0000 0000 8e07 0000            V.i8........
2010-08-22 21:35:26.571797 IP valh4.lell.net.ssh > zz.domain.innetbcp.net.50570: P 800464396:800464448(52) ack 203316566 win 71
2010-08-22 21:35:26.571800 IP valh4.lell.net.ssh > zz.domain.innetbcp.net.50570: P 52:168(116) ack 1 win 71
2010-08-22 21:35:26.584865 IP valh5.lell.net.ssh > 11.154.12.255.netbios-ns: NBT UDP PACKET(137): QUERY; REQUEST; BROADC

7. Capture packets with IP address using tcpdump -n

In all the above examples, it prints packets with the DNS address, but not the ip address. The following example captures the packets and it will display the IP address of the machines involved.
$ tcpdump -n -i eth0
15:01:35.170763 IP 10.0.19.121.52497 > 11.154.12.121.ssh: P 105:157(52) ack 18060 win 16549
15:01:35.170776 IP 11.154.12.121.ssh > 10.0.19.121.52497: P 23988:24136(148) ack 157 win 113
15:01:35.170894 IP 11.154.12.121.ssh > 10.0.19.121.52497: P 24136:24380(244) ack 157 win 113

8. Capture packets with proper readable timestamp using tcpdump -tttt

$ tcpdump -n -tttt -i eth0

2010-08-22 15:10:39.162830 IP 10.0.19.121.52497 > 11.154.12.121.ssh: . ack 49800 win 16390
2010-08-22 15:10:39.162833 IP 10.0.19.121.52497 > 11.154.12.121.ssh: . ack 50288 win 16660
2010-08-22 15:10:39.162867 IP 10.0.19.121.52497 > 11.154.12.121.ssh: . ack 50584 win 16586

9. Read packets longer than N bytes

You can receive only the packets greater than n number of bytes using a filter ‘greater’ through tcpdump command
$ tcpdump -w g_1024.pcap greater 1024

10. Receive only the packets of a specific protocol type

You can receive the packets based on the protocol type. You can specify one of these protocols — fddi, tr, wlan, ip, ip6, arp, rarp, decnet, tcp and udp. The following example captures only arp packets flowing through the eth0 interface.
$ tcpdump -i eth0 arp
tcpdump: verbose output suppressed, use -v or -vv for full protocol decode
listening on eth0, link-type EN10MB (Ethernet), capture size 96 bytes
19:41:52.809642 arp who-has valh5.lell.net tell valh9.lell.net
19:41:52.863689 arp who-has 11.154.12.1 tell valh6.lell.net
19:41:53.024769 arp who-has 11.154.12.1 tell valh7.lell.net

11. Read packets lesser than N bytes

You can receive only the packets lesser than n number of bytes using a filter ‘less’ through tcpdump command
$ tcpdump -w l_1024.pcap  less 1024

12. Receive packets flows on a particular port using tcpdump port

If you want to know all the packets received by a particular port on a machine, you can use tcpdump command as shown below.
$ tcpdump -i eth0 port 22
19:44:44.934459 IP valh4.lell.net.ssh > zz.domain.innetbcp.net.63897: P 18932:19096(164) ack 105 win 71
19:44:44.934533 IP valh4.lell.net.ssh > zz.domain.innetbcp.net.63897: P 19096:19260(164) ack 105 win 71
19:44:44.934612 IP valh4.lell.net.ssh > zz.domain.innetbcp.net.63897: P 19260:19424(164) ack 105 win 71

13. Capture packets for particular destination IP and Port

The packets will have source and destination IP and port numbers. Using tcpdump we can apply filters on source or destination IP and port number. The following command captures packets flows in eth0, with a particular destination ip and port number 22.
$ tcpdump -w xpackets.pcap -i eth0 dst 10.181.140.216 and port 22

14. Capture TCP communication packets between two hosts

If two different process from two different machines are communicating through tcp protocol, we can capture those packets using tcpdump as shown below.
$tcpdump -w comm.pcap -i eth0 dst 16.181.170.246 and port 22
You can open the file comm.pcap using any network protocol analyzer tool to debug any potential issues.

15. tcpdump Filter Packets – Capture all the packets other than arp and rarp

In tcpdump command, you can give “and”, “or” and “not” condition to filter the packets accordingly.
$ tcpdump -i eth0 not arp and not rarp
20:33:15.479278 IP resolver.lell.net.domain > valh4.lell.net.64639:  26929 1/0/0 (73)
20:33:15.479890 IP valh4.lell.net.16053 > resolver.lell.net.domain:  56556+ PTR? 255.107.154.15.in-addr.arpa. (45)
20:33:15.480197 IP valh4.lell.net.ssh > zz.domain.innetbcp.net.63897: P 540:1504(964) ack 1 win 96
20:33:15.487118 IP zz.domain.innetbcp.net.63897 > valh4.lell.net.ssh: . ack 540 win 16486
20:33:15.668599 IP 10.0.0.0 > all-systems.mcast.net: igmp query v3 [max resp time 1s]

The Ultimate Wget Download Guide With 15 Awesome Examples


Reference : http://www.thegeekstuff.com/2009/09/the-ultimate-wget-download-guide-with-15-awesome-examples/

The Ultimate Wget Download Guide With 15 Awesome Examples
by SathiyaMoorthy on September 28, 2009
15 Practical Examples to Download Images and Videos from Internetwget utility is the best option to download files from internet. wget can pretty much handle all complex download situations including large file downloads, recursive downloads, non-interactive downloads, multiple file downloads etc.,
In this article let us review how to use wget for various download scenarios using 15 awesome wget examples.

1. Download Single File with wget

The following example downloads a single file from internet and stores in the current directory.
$ wget http://www.openss7.org/repos/tarballs/strx25-0.9.2.1.tar.bz2
While downloading it will show a progress bar with the following information:
  • %age of download completion (for e.g. 31% as shown below)
  • Total amount of bytes downloaded so far (for e.g. 1,213,592 bytes as shown below)
  • Current download speed (for e.g. 68.2K/s as shown below)
  • Remaining time to download (for e.g. eta 34 seconds as shown below)
Download in progress:
$ wget http://www.openss7.org/repos/tarballs/strx25-0.9.2.1.tar.bz2
Saving to: `strx25-0.9.2.1.tar.bz2.1'

31% [=================> 1,213,592   68.2K/s  eta 34s
Download completed:
$ wget http://www.openss7.org/repos/tarballs/strx25-0.9.2.1.tar.bz2
Saving to: `strx25-0.9.2.1.tar.bz2'

100%[======================>] 3,852,374   76.8K/s   in 55s    

2009-09-25 11:15:30 (68.7 KB/s) - `strx25-0.9.2.1.tar.bz2' saved [3852374/3852374]

2. Download and Store With a Different File name Using wget -O

By default wget will pick the filename from the last word after last forward slash, which may not be appropriate always.
Wrong: Following example will download and store the file with name: download_script.php?src_id=7701
$ wget http://www.vim.org/scripts/download_script.php?src_id=7701
Even though the downloaded file is in zip format, it will get stored in the file as shown below.
$ ls
download_script.php?src_id=7701
Correct: To correct this issue, we can specify the output file name using the -O option as:
$ wget -O taglist.zip http://www.vim.org/scripts/download_script.php?src_id=7701

3. Specify Download Speed / Download Rate Using wget –limit-rate

While executing the wget, by default it will try to occupy full possible bandwidth. This might not be acceptable when you are downloading huge files on production servers. So, to avoid that we can limit the download speed using the –limit-rate as shown below.
In the following example, the download speed is limited to 200k
$ wget --limit-rate=200k http://www.openss7.org/repos/tarballs/strx25-0.9.2.1.tar.bz2

4. Continue the Incomplete Download Using wget -c

Restart a download which got stopped in the middle using wget -c option as shown below.
$ wget -c http://www.openss7.org/repos/tarballs/strx25-0.9.2.1.tar.bz2
This is very helpful when you have initiated a very big file download which got interrupted in the middle. Instead of starting the whole download again, you can start the download from where it got interrupted using option -c
Note: If a download is stopped in middle, when you restart the download again without the option -c, wget will append .1 to the filename automatically as a file with the previous name already exist. If a file with .1 already exist, it will download the file with .2 at the end.

5. Download in the Background Using wget -b

For a huge download, put the download in background using wget option -b as shown below.
$ wget -b http://www.openss7.org/repos/tarballs/strx25-0.9.2.1.tar.bz2
Continuing in background, pid 1984.
Output will be written to `wget-log'.
It will initiate the download and gives back the shell prompt to you. You can always check the status of the download using tail -f as shown below.
$ tail -f wget-log
Saving to: `strx25-0.9.2.1.tar.bz2.4'

     0K .......... .......... .......... .......... ..........  1% 65.5K 57s
    50K .......... .......... .......... .......... ..........  2% 85.9K 49s
   100K .......... .......... .......... .......... ..........  3% 83.3K 47s
   150K .......... .......... .......... .......... ..........  5% 86.6K 45s
   200K .......... .......... .......... .......... ..........  6% 33.9K 56s
   250K .......... .......... .......... .......... ..........  7%  182M 46s
   300K .......... .......... .......... .......... ..........  9% 57.9K 47s
Also, make sure to review our previous multitail article on how to use tail command effectively to view multiple files.

6. Mask User Agent and Display wget like Browser Using wget –user-agent

Some websites can disallow you to download its page by identifying that the user agent is not a browser. So you can mask the user agent by using –user-agent options and show wget like a browser as shown below.
$ wget --user-agent="Mozilla/5.0 (X11; U; Linux i686; en-US; rv:1.9.0.3) Gecko/2008092416 Firefox/3.0.3" URL-TO-DOWNLOAD

7. Test Download URL Using wget –spider

When you are going to do scheduled download, you should check whether download will happen fine or not at scheduled time. To do so, copy the line exactly from the schedule, and then add –spider option to check.
$ wget --spider DOWNLOAD-URL
If the URL given is correct, it will say
$ wget --spider download-url
Spider mode enabled. Check if remote file exists.
HTTP request sent, awaiting response... 200 OK
Length: unspecified [text/html]
Remote file exists and could contain further links,
but recursion is disabled -- not retrieving.
This ensures that the downloading will get success at the scheduled time. But when you had give a wrong URL, you will get the following error.
$ wget --spider download-url
Spider mode enabled. Check if remote file exists.
HTTP request sent, awaiting response... 404 Not Found
Remote file does not exist -- broken link!!!
You can use the spider option under following scenarios:
  • Check before scheduling a download.
  • Monitoring whether a website is available or not at certain intervals.
  • Check a list of pages from your bookmark, and find out which pages are still exists.

8. Increase Total Number of Retry Attempts Using wget –tries

If the internet connection has problem, and if the download file is large there is a chance of failures in the download. By default wget retries 20 times to make the download successful.
If needed, you can increase retry attempts using –tries option as shown below.
$ wget --tries=75 DOWNLOAD-URL

9. Download Multiple Files / URLs Using Wget -i

First, store all the download files or URLs in a text file as:
$ cat > download-file-list.txt
URL1
URL2
URL3
URL4
Next, give the download-file-list.txt as argument to wget using -i option as shown below.
$ wget -i download-file-list.txt

10. Download a Full Website Using wget –mirror

Following is the command line which you want to execute when you want to download a full website and made available for local viewing.
$ wget --mirror -p --convert-links -P ./LOCAL-DIR WEBSITE-URL
  • –mirror : turn on options suitable for mirroring.
  • -p : download all files that are necessary to properly display a given HTML page.
  • –convert-links : after the download, convert the links in document for local viewing.
  • -P ./LOCAL-DIR : save all the files and directories to the specified directory.

11. Reject Certain File Types while Downloading Using wget –reject

You have found a website which is useful, but don’t want to download the images you can specify the following.
$ wget --reject=gif WEBSITE-TO-BE-DOWNLOADED

12. Log messages to a log file instead of stderr Using wget -o

When you wanted the log to be redirected to a log file instead of the terminal.
$ wget -o download.log DOWNLOAD-URL

13. Quit Downloading When it Exceeds Certain Size Using wget -Q

When you want to stop download when it crosses 5 MB you can use the following wget command line.
$ wget -Q5m -i FILE-WHICH-HAS-URLS
Note: This quota will not get effect when you do a download a single URL. That is irrespective of the quota size everything will get downloaded when you specify a single file. This quota is applicable only for recursive downloads.

14. Download Only Certain File Types Using wget -r -A

You can use this under following situations:
  • Download all images from a website
  • Download all videos from a website
  • Download all PDF files from a website
$ wget -r -A.pdf http://url-to-webpage-with-pdfs/

15. FTP Download With wget

You can use wget to perform FTP download as shown below.
Anonymous FTP download using Wget
$ wget ftp-url
FTP download using wget with username and password authentication.
$ wget --ftp-user=USERNAME --ftp-password=PASSWORD DOWNLOAD-URL
If you liked this article, please bookmark it with delicious or Stumble.

How to Backup Linux? 15 rsync Command Examples

How to Backup Linux? 15 rsync Command Examples

by Sasikala on September 9, 2010
rsync stands for remote sync.
rsync is used to perform the backup operation in UNIX / Linux.
rsync utility is used to synchronize the files and directories from one location to another in an effective way. Backup location could be on local server or on remote server.

Important features of rsync

  • Speed: First time, rsync replicates the whole content between the source and destination directories. Next time, rsync transfers only the changed blocks or bytes to the destination location, which makes the transfer really fast.
  • Security: rsync allows encryption of data using ssh protocol during transfer.
  • Less Bandwidth: rsync uses compression and decompression of data block by block at the sending and receiving end respectively. So the bandwidth used by rsync will be always less compared to other file transfer protocols.
  • Privileges: No special privileges are required to install and execute rsync

Syntax

$ rsync options source destination
Source and destination could be either local or remote. In case of remote, specify the login name, remote server name and location.

Example 1. Synchronize Two Directories in a Local Server

To sync two directories in a local computer, use the following rsync -zvr command.
$ rsync -zvr /var/opt/installation/inventory/ /root/temp
building file list ... done
sva.xml
svB.xml
.
sent 26385 bytes  received 1098 bytes  54966.00 bytes/sec
total size is 44867  speedup is 1.63
$
In the above rsync example:
  • -z is to enable compression
  • -v verbose
  • -r indicates recursive
Now let us see the timestamp on one of the files that was copied from source to destination. As you see below, rsync didn’t preserve timestamps during sync.
$ ls -l /var/opt/installation/inventory/sva.xml /root/temp/sva.xml
-r--r--r-- 1 bin  bin  949 Jun 18  2009 /var/opt/installation/inventory/sva.xml
-r--r--r-- 1 root bin  949 Sep  2  2009 /root/temp/sva.xml

Example 2. Preserve timestamps during Sync using rsync -a

rsync option -a indicates archive mode. -a option does the following,
  • Recursive mode
  • Preserves symbolic links
  • Preserves permissions
  • Preserves timestamp
  • Preserves owner and group
Now, executing the same command provided in example 1 (But with the rsync option -a) as shown below:
$ rsync -azv /var/opt/installation/inventory/ /root/temp/
building file list ... done
./
sva.xml
svB.xml
.
sent 26499 bytes  received 1104 bytes  55206.00 bytes/sec
total size is 44867  speedup is 1.63
$
As you see below, rsync preserved timestamps during sync.
$ ls -l /var/opt/installation/inventory/sva.xml /root/temp/sva.xml
-r--r--r-- 1 root  bin  949 Jun 18  2009 /var/opt/installation/inventory/sva.xml
-r--r--r-- 1 root  bin  949 Jun 18  2009 /root/temp/sva.xml

Example 3. Synchronize Only One File

To copy only one file, specify the file name to rsync command, as shown below.
$ rsync -v /var/lib/rpm/Pubkeys /root/temp/
Pubkeys

sent 42 bytes  received 12380 bytes  3549.14 bytes/sec
total size is 12288  speedup is 0.99

Example 4. Synchronize Files From Local to Remote

rsync allows you to synchronize files/directories between the local and remote system.
$ rsync -avz /root/temp/ thegeekstuff@192.168.200.10:/home/thegeekstuff/temp/
Password:
building file list ... done
./
rpm/
rpm/Basenames
rpm/Conflictname

sent 15810261 bytes  received 412 bytes  2432411.23 bytes/sec
total size is 45305958  speedup is 2.87
While doing synchronization with the remote server, you need to specify username and ip-address of the remote server. You should also specify the destination directory on the remote server. The format is username@machinename:path
As you see above, it asks for password while doing rsync from local to remote server.
Sometimes you don’t want to enter the password while backing up files from local to remote server. For example, If you have a backup shell script, that copies files from local to remote server using rsync, you need the ability to rsync without having to enter the password.
To do that, setup ssh password less login as we explained earlier.

Example 5. Synchronize Files From Remote to Local

When you want to synchronize files from remote to local, specify remote path in source and local path in target as shown below.
$ rsync -avz thegeekstuff@192.168.200.10:/var/lib/rpm /root/temp
Password:
receiving file list ... done
rpm/
rpm/Basenames
.
sent 406 bytes  received 15810230 bytes  2432405.54 bytes/sec
total size is 45305958  speedup is 2.87

Example 6. Remote shell for Synchronization

rsync allows you to specify the remote shell which you want to use. You can use rsync ssh to enable the secured remote connection.
Use rsync -e ssh to specify which remote shell to use. In this case, rsync will use ssh.
$ rsync -avz -e ssh thegeekstuff@192.168.200.10:/var/lib/rpm /root/temp
Password:
receiving file list ... done
rpm/
rpm/Basenames

sent 406 bytes  received 15810230 bytes  2432405.54 bytes/sec
total size is 45305958  speedup is 2.87

Example 7. Do Not Overwrite the Modified Files at the Destination

In a typical sync situation, if a file is modified at the destination, we might not want to overwrite the file with the old file from the source.
Use rsync -u option to do exactly that. (i.e do not overwrite a file at the destination, if it is modified). In the following example, the file called Basenames is already modified at the destination. So, it will not be overwritten with rsync -u.
$ ls -l /root/temp/Basenames
total 39088
-rwxr-xr-x 1 root root        4096 Sep  2 11:35 Basenames

$ rsync -avzu thegeekstuff@192.168.200.10:/var/lib/rpm /root/temp
Password:
receiving file list ... done
rpm/

sent 122 bytes  received 505 bytes  114.00 bytes/sec
total size is 45305958  speedup is 72258.31

$ ls -lrt
total 39088
-rwxr-xr-x 1 root root        4096 Sep  2 11:35 Basenames

Example 8. Synchronize only the Directory Tree Structure (not the files)

Use rsync -d option to synchronize only directory tree from source to the destination. The below example, synchronize only directory tree in recursive manner, not the files in the directories.
$ rsync -v -d thegeekstuff@192.168.200.10:/var/lib/ .
Password:
receiving file list ... done
logrotate.status
CAM/
YaST2/
acpi/

sent 240 bytes  received 1830 bytes  318.46 bytes/sec
total size is 956  speedup is 0.46

Example 9. View the rsync Progress during Transfer

When you use rsync for backup, you might want to know the progress of the backup. i.e how many files are copies, at what rate it is copying the file, etc.
rsync –progress option displays detailed progress of rsync execution as shown below.
$ rsync -avz --progress thegeekstuff@192.168.200.10:/var/lib/rpm/ /root/temp/
Password:
receiving file list ...
19 files to consider
./
Basenames
     5357568 100%   14.98MB/s    0:00:00 (xfer#1, to-check=17/19)
Conflictname
       12288 100%   35.09kB/s    0:00:00 (xfer#2, to-check=16/19)
.
.
.
sent 406 bytes  received 15810211 bytes  2108082.27 bytes/sec
total size is 45305958  speedup is 2.87
You can also use rsnapshot utility (that uses rsync) to backup local linux server, or backup remote linux server.

Example 10. Delete the Files Created at the Target

If a file is not present at the source, but present at the target, you might want to delete the file at the target during rsync.
In that case, use –delete option as shown below. rsync delete option deletes files that are not there in source directory.
# Source and target are in sync. Now creating new file at the target.
$ > new-file.txt

$ rsync -avz --delete thegeekstuff@192.168.200.10:/var/lib/rpm/ .
Password:
receiving file list ... done
deleting new-file.txt
./

sent 26 bytes  received 390 bytes  48.94 bytes/sec
total size is 45305958  speedup is 108908.55
Target has the new file called new-file.txt, when synchronize with the source with –delete option, it removed the file new-file.txt

Example 11. Do not Create New File at the Target

If you like, you can update (Sync) only the existing files at the target. In case source has new files, which is not there at the target, you can avoid creating these new files at the target. If you want this feature, use –existing option with rsync command.
First, add a new-file.txt at the source.
[/var/lib/rpm ]$ > new-file.txt
Next, execute the rsync from the target.
$ rsync -avz --existing root@192.168.1.2:/var/lib/rpm/ .
root@192.168.1.2's password:
receiving file list ... done
./

sent 26 bytes  received 419 bytes  46.84 bytes/sec
total size is 88551424  speedup is 198991.96
If you see the above output, it didn’t receive the new file new-file.txt

Example 12. View the Changes Between Source and Destination

This option is useful to view the difference in the files or directories between source and destination.
At the source:
$ ls -l /var/lib/rpm
-rw-r--r-- 1 root root  5357568 2010-06-24 08:57 Basenames
-rw-r--r-- 1 root root    12288 2008-05-28 22:03 Conflictname
-rw-r--r-- 1 root root  1179648 2010-06-24 08:57 Dirnames
At the destination:
$ ls -l /root/temp
-rw-r--r-- 1 root root    12288 May 28  2008 Conflictname
-rw-r--r-- 1 bin  bin   1179648 Jun 24 05:27 Dirnames
-rw-r--r-- 1 root root        0 Sep  3 06:39 Basenames
In the above example, between the source and destination, there are two differences. First, owner and group of the file Dirname differs. Next, size differs for the file Basenames.
Now let us see how rsync displays this difference. -i option displays the item changes.
$ rsync -avzi thegeekstuff@192.168.200.10:/var/lib/rpm/ /root/temp/
Password:
receiving file list ... done
>f.st.... Basenames
.f....og. Dirnames

sent 48 bytes  received 2182544 bytes  291012.27 bytes/sec
total size is 45305958  speedup is 20.76
In the output it displays some 9 letters in front of the file name or directory name indicating the changes.
In our example, the letters in front of the Basenames (and Dirnames) says the following:
> specifies that a file is being transferred to the local host.
f represents that it is a file.
s represents size changes are there.
t represents timestamp changes are there.
o owner changed
g group changed.

Example 13. Include and Exclude Pattern during File Transfer

rsync allows you to give the pattern you want to include and exclude files or directories while doing synchronization.
$ rsync -avz --include 'P*' --exclude '*' thegeekstuff@192.168.200.10:/var/lib/rpm/ /root/temp/
Password:
receiving file list ... done
./
Packages
Providename
Provideversion
Pubkeys

sent 129 bytes  received 10286798 bytes  2285983.78 bytes/sec
total size is 32768000  speedup is 3.19
In the above example, it includes only the files or directories starting with ‘P’ (using rsync include) and excludes all other files. (using rsync exclude ‘*’ )

Example 14. Do Not Transfer Large Files

You can tell rsync not to transfer files that are greater than a specific size using rsync –max-size option.
$ rsync -avz --max-size='100K' thegeekstuff@192.168.200.10:/var/lib/rpm/ /root/temp/
Password:
receiving file list ... done
./
Conflictname
Group
Installtid
Name
Sha1header
Sigmd5
Triggername

sent 252 bytes  received 123081 bytes  18974.31 bytes/sec
total size is 45305958  speedup is 367.35
max-size=100K makes rsync to transfer only the files that are less than or equal to 100K. You can indicate M for megabytes and G for gigabytes.

Example 15. Transfer the Whole File

One of the main feature of rsync is that it transfers only the changed block to the destination, instead of sending the whole file.
If network bandwidth is not an issue for you (but CPU is), you can transfer the whole file, using rsync -W option. This will speed-up the rsync process, as it doesn’t have to perform the checksum at the source and destination.
#  rsync -avzW  thegeekstuff@192.168.200.10:/var/lib/rpm/ /root/temp
Password:
receiving file list ... done
./
Basenames
Conflictname
Dirnames
Filemd5s
Group
Installtid
Name

sent 406 bytes  received 15810211 bytes  2874657.64 bytes/sec
total size is 45305958  speedup is 2.87

Top 5 Best System Monitoring Tools


http://www.thegeekstuff.com/2009/09/top-5-best-network-monitoring-tools/

Top 5 Best System Monitoring Tools
by Ramesh Natarajan on September 2, 2009
As part of the contest we conducted recently, we got 130 comments from the geeky readers who choose their favorite system monitoring tools.
Based on this data, the top spot goes to..  drum roll please..
Nagios
If you are new to any of the top 5 tools mentioned here, please read the rest of the article to understand more about them.

Top 5 Best Free Network Monitoring Tool
Fig: Favorite System Monitoring Tool Voting Results

1. Nagios – Network Monitoring Software

Nagios System Monitoring Tools for LinuxNagios won by a huge margin. This is not a suprise to lot of people, as Nagios is hands-down the best monitoring tool.  As you already know, I love Nagios and have been using it for a long time. I have also written several tutorials on Nagios (and many more to come).
Nagios Core 3 eBook is the only guide you’ll ever need to monitor everything, be proactive, and sleep well.

2. Cacti – Network Monitoring Software

Cacti Network Monitoring Tool for UnixCacti uses RRDtool for the network graphing solution. Using Caci you can monitor and graph – CPU Load, Network bandwidth utilization, network traffic monitor etc.,
Cacti also supports plugin architecture. Some admins like the powerful graphing feature provided by Cacti, they use both Nagios and Cacti in their environment as the network monitoring tools.

3. Top (and other top variations)

Unix top, ntop command for Network Monitoring
  • Top Command – Few of you have mentioned top command as your favorite monitoring tool :-)
  • ntop (Network Top) – Ntop is a free network monitoring software. ntop displays network usage information in a similar fashion to top command output. You can also create HTML output file (dump) of the network status using ntop.  Apart from the command line, you can also launch the web version of the ntop once you’ve started the ntopd service and visit http://{ip-address}:3000 from browser.
  • htop (interactive process viewer for Linux) – htop is similar to top command with few additional features. The main difference is that you can use mouse to interact with the htop command output.

4. Zabbix

Zabbix Open Source Infrastructure Monitoring Solution for Unix PlatformsZabbiz is an open source monitoring solution with a commercial support provided by a company – Zabbix SIA, who primarily develops the software.  Zabbix requires a database to store the monitoring data. You can choose any DB of your choice – MySQL, PostgreSQL, Oracle, or SQLite.
Zabbix has the following three main modules:
  • Server (written in C)
  • Agents (written in C)
  • Frontend (PHP and Javascript)
Additional information about Zabbix:

5. Munin

Munin Network Badwidth Monitoring Platform Using PluginsSimilar to Cacti, Munin uses RRDTool to present the output in a pretty graph via web interface. The primary emphasis of Munin is on the plug and play architecture for it’s plugin. There are lot of plugins available for Munin, which will just work out-of-the box without lot of tweaking.

Can You Top This? 15 Practical Linux Top Command Examples


http://www.thegeekstuff.com/2010/01/15-practical-unix-linux-top-command-examples/

Can You Top This? 15 Practical Linux Top Command Examples
by Ramesh Natarajan on January 4, 2010
UNIX / Linux Top Command ExamplesThis article is part of the on-going 15 example series where 15 examples will be provided for a specific command or functionality. In this series, earlier we discussed about find command, crontab examples, grep command, history command, ping command, and wget examples.
In this article, let us review 15 examples for Linux top command that will be helpful for both newbies and experts.

1. Show Processes Sorted by any Top Output Column – Press O

By default top command displays the processes in the order of CPU usage.  When the top command is running, press M (upper-case) to display processes sorted by memory usage as shown below.
Top Command Sort By Memory Usage
Fig: Press M to sort by memory usage – Unix top command
To sort top output by any column, Press O (upper-case O) , which will display all the possible columns that you can sort by as shown below.
Current Sort Field:  P  for window 1:Def
Select sort field via field letter, type any other key to return 

  a: PID        = Process Id              v: nDRT       = Dirty Pages count
  d: UID        = User Id                 y: WCHAN      = Sleeping in Function
  e: USER       = User Name               z: Flags      = Task Flags
  ........
When the linux top command is running, Press R, which does the sort in reverse order.

2. Kill a Task Without Exiting From Top – Press k

Once you’ve located a process that needs to be killed, press ‘k’ which will ask for the process id, and signal to send.  If you have the privilege to kill that particular PID, it will get killed successfully.
PID to kill: 1309
Kill PID 1309 with signal [15]: 
  PID USER      PR  NI  VIRT  RES  SHR S %CPU %MEM    TIME+  COMMAND
 1309 geek   23   0 2483m 1.7g  27m S    0 21.8  45:31.32 gagent
 1882 geek   25   0 2485m 1.7g  26m S    0 21.7  22:38.97 gagent
 5136 root    16   0 38040  14m 9836 S    0  0.2   0:00.39 nautilus

3. Renice a Unix Process Without Exiting From Top – Press r

Press r, if you want to just change the priority of the process (and not kill the process). This will ask PID for renice, enter the PID and priority.

PID to renice: 1309
Renice PID 1309 to value: 
  PID USER      PR  NI  VIRT  RES  SHR S %CPU %MEM    TIME+  COMMAND
 1309 geek   23   0 2483m 1.7g  27m S    0 21.8  45:31.32 gagent
 1882 geek   25   0 2485m 1.7g  26m S    0 21.7  22:38.97 gagent

4. Display Selected User in Top Output Using top -u

Use top -u to display a specific user processes only in the top command output.
$ top -u geek
While unix top command is running, press u which will ask for username as shown below.
Which user (blank for all): geek
  PID USER      PR  NI  VIRT  RES  SHR S %CPU %MEM    TIME+  COMMAND
 1309 geek   23   0 2483m 1.7g  27m S    0 21.8  45:31.32 gagent
 1882 geek   25   0 2485m 1.7g  26m S    0 21.7  22:38.97 gagent

Display Only Specific Process with Given PIDs Using top -p

Use top -p as shown below to display specific PIDs.
$ top -p 1309, 1882
  PID USER      PR  NI  VIRT  RES  SHR S %CPU %MEM    TIME+  COMMAND
 1309 geek   23   0 2483m 1.7g  27m S    0 21.8  45:31.32 gagent
 1882 geek   25   0 2485m 1.7g  26m S    0 21.7  22:38.97 gagent

5. Display All CPUs / Cores in the Top Output – Press 1 (one)

Top output by default shows CPU line for all the CPUs combined together as shown below.
top - 20:10:39 up 40 days, 23:02,  1 user,  load average: 4.97, 2.01, 1.25
Tasks: 310 total,   1 running, 309 sleeping,   0 stopped,   0 zombie
Cpu(s):  0.5%us,  0.7%sy,  0.0%ni, 92.3%id,  6.4%wa,  0.0%hi,  0.0%si,  0.0%st
Press 1 (one), when the top command is running, which will break the CPU down and show details for all the individual CPUs running on the system as shown below.
top - 20:10:07 up 40 days, 23:03,  1 user,  load average: 5.32, 2.38, 1.39
Tasks: 341 total,   3 running, 337 sleeping,   0 stopped,   1 zombie
Cpu0  :  7.7%us,  1.7%sy,  0.0%ni, 79.5%id, 11.1%wa,  0.0%hi,  0.0%si,  0.0%st
Cpu1  :  0.3%us,  0.0%sy,  0.0%ni, 94.9%id,  4.7%wa,  0.0%hi,  0.0%si,  0.0%st
Cpu2 :  3.3%us,  0.7%sy,  0.0%ni, 55.7%id, 40.3%wa,  0.0%hi,  0.0%si,  0.0%st
Cpu3 :  5.0%us,  1.0%sy,  0.0%ni, 86.2%id,  7.4%wa,  0.0%hi,  0.3%si,  0.0%st
Cpu4  : 38.5%us,  5.4%sy,  0.3%ni,  0.0%id, 54.8%wa,  0.0%hi,  1.0%si,  0.0%st
Cpu5  :  0.0%us,  0.0%sy,  0.0%ni,100.0%id,  0.0%wa,  0.0%hi,  0.0%si,  0.0%st
Cpu6  :  0.3%us,  0.7%sy,  0.0%ni, 97.3%id,  1.7%wa,  0.0%hi,  0.0%si,  0.0%st
Cpu7  :  5.4%us,  4.4%sy,  0.0%ni, 82.6%id,  7.7%wa,  0.0%hi,  0.0%si,  0.0%st
Cpu8 :  1.7%us,  1.7%sy,  0.0%ni, 72.8%id, 23.8%wa,  0.0%hi,  0.0%si,  0.0%st

6. Refresh Unix Top Command Output On demand (or) Change Refresh Interval

By default, linux top command updates the output every 3.0 seconds. When you want to update the output on-demand, press space bar.
To change the output update frequency, press d in interactive mode, and enter the time in seconds as shown below.
Change delay from 3.0 to: 10
  PID USER      PR  NI  VIRT  RES  SHR S %CPU %MEM    TIME+  COMMAND
 1309 geek   23   0 2483m 1.7g  27m S    0 21.8  45:31.32 gagent
 1882 geek   25   0 2485m 1.7g  26m S    0 21.7  22:38.97 gagent

7. Highlight Running Processes in the Linux Top Command Output – Press z or b

Press z or b, which will highlight all running process as shown below.
Highlight Running Process on Ubuntu Linux Using Top Command
Fig: Ubuntu Linux – top command highlights running process

8. Display Absolute Path of the Command and its Arguments – Press c

Press c which will show / hide command absolute path, and arguments as shown below.
PID USER      PR  NI  VIRT  RES  SHR S %CPU %MEM    TIME+  COMMAND
 1309 geek   23   0 2483m 1.7g  27m S    0 21.8  45:31.32 /usr/sbin/gagent
 1882 geek   25   0 2485m 1.7g  26m S    0 21.7  22:38.97 /usr/sbin/gagent -l 0 -u pre

9. Quit Top Command After a Specified Number of Iterations Using top -n

Until you press q, top continuously displays the output. If you would like to view only a certain iteration and want the top to exit automatically use -n option as shown below.
The following example will show 2 iterations of unix top command output and exit automatically
$ top -n 2

10. Executing Unix Top Command in Batch Mode

If you want to execute top command in the batch mode use option -b as shown below.
$ top -b -n 1
Note: This option is very helpful when you want to capture the unix top command output to a readable text file as we discussed earlier.

11. Split Top Output into Multiple Panels – Press A

To display multiple views of top command output on the terminal, press A. You can cycle through these windows using ‘a’. This is very helpful, when you can sort the output on multiple windows using different top output columns.

12. Get Top Command Help from Command Line and Interactively

Get a quick command line option help using top -h as shown below.
$ top -h
        top: procps version 3.2.0
usage:  top -hv | -bcisS -d delay -n iterations [-u user | -U user] -p pid [,pid ...]
Press h while top command is running, which will display help for interactive top commands.
Help for Interactive Commands - procps version 3.2.0
Window 1:Def: Cumulative mode Off.  System: Delay 3.0 secs; Secure mode Off.

  Z,B       Global: 'Z' change color mappings; 'B' disable/enable bold
  l,t,m     Toggle Summaries: 'l' load avg; 't' task/cpu stats; 'm' mem info
  1,I       Toggle SMP view: '1' single/separate states; 'I' Irix/Solaris mode
  ..........

13. Decrease Number of Processes Displayed in Top Output – Press n

Press n in the Interactive mode, which prompts for a number and shows only that. Following example will display only 2 process as a time.
Maximum tasks = 0, change to (0 is unlimited): 2
  PID USER      PR  NI  VIRT  RES  SHR S %CPU %MEM    TIME+  COMMAND
 1309 geek   23   0 2483m 1.7g  27m S    0 21.8  45:31.32 gagent
 1882 geek   25   0 2485m 1.7g  26m S    0 21.7  22:38.97 gagent

14. Toggle Top Header to Increase Number of Processes Displayed

By default top displays total number process based on the window height. If you like to see additional process you might want to eliminate some of the top header information.
Following is the default header information provided by top.
top - 23:47:32 up 179 days,  3:36,  1 user,  load average: 0.01, 0.03, 0.00
Tasks:  67 total,   1 running,  66 sleeping,   0 stopped,   0 zombie
Cpu(s):   0.7% user,   1.2% system,   0.0% nice,  98.0% idle
Mem:   1017136k total,   954652k used,    62484k free,   138280k buffers
Swap:  3068404k total,    22352k used,  3046052k free,   586576k cached
  • Press l – to hide / show the load average. 1st header line.
  • Press t – to hide / show the CPU states. 2nd and 3rd header line.
  • Press m – to hide / show the memory information. 4th and 5th line.

15. Save Top Configuration Settings – Press W

If you’ve made any interactive top command configurations suggested in the above examples, you might want to save those for all future top command output. Once you’ve saved the top configuration, next time when you invoke the top command all your saved top configuration options will be used automatically.
To save the top configuration, press W, which will write the configuration files to ~/.toprc. This will display the write confirmation message as shown below.
top - 23:47:32 up 179 days,  3:36,  1 user,  load average: 0.01, 0.03, 0.00
Tasks:  67 total,   1 running,  66 sleeping,   0 stopped,   0 zombie
Cpu(s):   0.7% user,   1.2% system,   0.0% nice,  98.0% idle
Mem:   1017136k total,   954652k used,    62484k free,   138280k buffers
Swap:  3068404k total,    22352k used,  3046052k free,   586576k cached
Wrote configuration to '/home/ramesh/.toprc'

Vi and Vim Macro Tutorial: How To Record and Play


Reference : http://www.thegeekstuff.com/2009/01/vi-and-vim-macro-tutorial-how-to-record-and-play/

Vi and Vim Macro Tutorial: How To Record and Play
by SathiyaMoorthy on January 16, 2009
Vim Macros - Record and Play
Using Vim Macro feature you can record and play a sequence of actions inside the editor.

This article explains how to perform record and play inside Vi and Vim editor using two detailed examples.


High Level Steps to Record and Play inside Vim

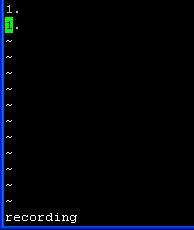
  1. Start recording by pressing q, followed by a lower case character to name the macro
  2. Perform any typical editing, actions inside Vim editor, which will be recorded
  3. Stop recording by pressing q
  4. Play the recorded macro by pressing @ followed by the macro name
  5. To repeat macros multiple times, press : NN @ macro name. NN is a number

Example 1: Sequence number generation inside a file using Vim Macro

1. Start a sequence-test.txt file to generate the sequence.

$ vim sequence-test.txt

2. Go to insert mode and type “1 .” as shown below

Type: Esc i followed by 1.
$ vim sequence-test.txt
1.

3. Start the Recording and store it in register a.

Type: Esc q followed by a
  • q indicates to start the recording
  • a indicates to store the recordings in register a
  • When you do q a, it will display “recording” at the bottom of the vi.

4. Copy the 1st line to 2nd line to have two lines with 1 . as shown below

Type: Esc yy followed by p
  • yy will copy the current line
  • p will paste the line that was just copied
$ vim sequence-test.txt
1.
1.
Note: Vim will still show recording at the bottom as shown below.
Vim Recording Message
Fig: Vim showing recording message at the bottom

5. Increment the number.

Type: Control a

By placing the cursor at the 2nd line, press Ctrl+a which increment the number to 2. as shown below.
$ vim sequence-test.txt
1.
2.
Note: vim will still show recording at the bottom.

6. Stop the recording

Type: q

Press q to stop the recording. You’ll notice that recording message at the bottom of the vim is now gone.

7. Repeat the recording 98 times.

Type: 98@a

  • Now repeat this job, by typing 98 @ a
  • @a repeats the macro “a” one time.
  • 98@a repeats the macros “a” 98 times generating the sequence number 1 – 100 as shown below using macros.
Vim Macro Record and Play
Fig: Generate Sequence Number in Vim using Macro

Example 2: Repeat Vim Macro with different arguments

This example explains how you can executing the same command, with different input for it. i.e Framing the same command, with different arguments.

Before Executing the Macro: change-password.sql

$ vim change-password.sql
Annette
Warren
Anthony
Preston
Kelly
Taylor
Stiller
Dennis
Schwartz

After Recording and executing the Macro: change-password.sql

$ vim change-password.sql
ALTER USER Annette IDENTIFIED BY 'Annette';
ALTER USER Warren IDENTIFIED BY 'Warren';
ALTER USER Anthony IDENTIFIED BY 'Anthony ';
ALTER USER Preston IDENTIFIED BY 'Preston';
ALTER USER Kelly IDENTIFIED BY 'Kelly ';
ALTER USER Taylor IDENTIFIED BY 'Taylor';
ALTER USER Stiller IDENTIFIED BY 'Stiller';
ALTER USER Dennis IDENTIFIED BY 'Dennis';
ALTER USER Schwart IDENTIFIED BY 'Schwart';

1. Open the change-password.sql that has only the names.

$ vim change-password.sql
Annette
Warren
Anthony
Preston
Kelly
Taylor
Stiller
Dennis
Schwartz

2. Start the Recording and store it in register a

Type: q a
  • q indicates to start the recording
  • a indicates to store the recordings in register a
  • When you do q a, it will display the message recording at the bottom of the vi.

3. Go to Insert Mode and Type ALTER USER

Type: I (Upper case i) followed by “ALTER USER ”

Place the cursor anywhere in the first line, and then press I. Which will take you to the first character of the line. Type ALTER USER

4. Copy the Next Word (i.e the name)

Type: Esc w yw
  • Press Esc, and then press w to go to the next word ( name ).
  • yw, copies the current word ( name ).

5.Go to the end and type IDENTIFIED BY ‘

Type: Esc A followed by ” IDENTIFIED BY ‘”
  • Press Esc, and A to move the cursor to the end of the line, and then type space.
  • Type IDENTIFIED BY ‘

6. Paste the copied Name

Type: Esc p

Press Esc, and then type p to paste the name that was copied in the step #4.

7. Complete the quote at the end.

Type: Esc A followed by ‘;

Press Esc, and A to go to the end of the line, and ‘;

8. Jump to the next line and stop the record.

Type: Esc j followed by q
  • j to move to the next line.
  • q to stop the recording
Note: The recording message shown in the bottom of the vi will now disappear. At this stage, the change-password.sql will look like the following.
Vim Macro Recording
Fig: Vim Macro completed the recording

9. Repete the Macro with the arguments in the corresponding line

Type: 8 @ a
  • Now repeat this job 8 times by typing 8@a
  • @a repeats the macro “a” one time.
  • 8@a repeats the macros “a” 8 times completing the rest of the line automatically as shown below
Vim Macro Play Recording
Fig: Vim Macro Play completed

Recommended Reading

Vim 101 Hacks, by Ramesh Natarajan. I’m a command-line junkie. So, naturally I’m a huge fan of Vi and Vim editors. Several years back, when I wrote lot of C code on Linux, I used to read all available Vim editor tips and tricks. Based on my Vim editor experience, I’ve written Vim 101 Hacks eBook that contains 101 practical examples on various advanced Vim features that will make you fast and productive in the Vim editor. Even if you’ve been using Vi and Vim Editors for several years and have not read this book, please do yourself a favor and read this book. You’ll be amazed with the capabilities of Vim editor.

Awesome Vim Editor Articles

Following are few awesome Vi / Vim editor tutorials that you might find helpful.